Project Bikes: Honda CR250 Trail Bike Conversion
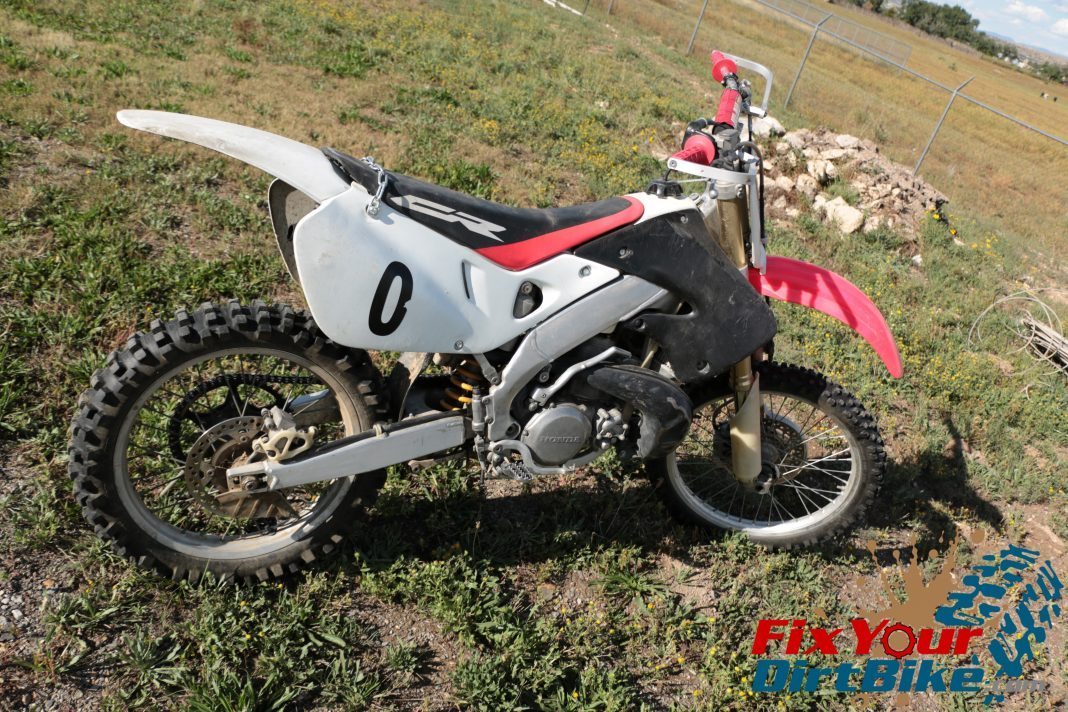
I picked up this 1997 Honda CR250 (2-stroke) for about $700 in the summer of 2013. And I’m still not sure if I overpaid. The bike starts and runs just fine, so that’s a plus. Only a few things on this CR need to be fixed, but they are also the most important.
The Good
- The engine is in excellent condition and will kick over cold in about three kicks.
- The tires are new(ish).
- Rims true; spokes are straight
- The O-ring chain needed some maintenance but is still good.
- I can ride the bike as it is, but it isn’t pretty.
- New handlebars were made by the previous owner, who hit a tree.
The Bad
- Forks and rear shock are done for.
- The exhaust also has a massive dent, and I’m sure the power valve is stuck.
- Countershaft (front) and rear-wheel sprocket teeth were rounded off completely. (I had to cut the rear sprocket off with a cutting wheel piece by piece because of the rust)
- The radiator has almost all of its fins folded over.
 The Plan: Since I must completely rebuild the suspension and replace the exhaust, I saw an opportunity to make a killer two-stroke trail bike. 1997 was the first year the aluminum chassis for the Honda CR250 was produced, so I was already at a weight advantage. The bike is a kickstart, but I can probably get by without an electric starter since it turns over so quickly.
Testing My CR250 Trail Bike Conversion Theory
Before I tried anything, I needed to get this Honda CR250 setup for what I wanted to do. To test my idea, I ordered new sprockets, grips, bark busters, and handlebar risers. If my test works out, I will have a good idea of what needs to be done to make this wood conversion run with ACTUAL Honda trail bikes like the CR250x. I bought everything on this list from Amazon.com to save as much money as possible. I have added links so you can find what you need for your trail bike conversion at the best price possible.
All About Control
Handlebar Grips: I upgraded to Oury MX grips. I wanted to make a point about these grips because they are cheaper than factory replacements, super comfortable, and stay tacky when wet. I’ve been using these grips on every machine I’ve ever owned, and I highly recommend them.

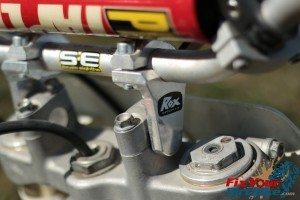
Handlebar Risers: I installed the handlebar risers because I am 6’6″ and don’t like feeling like a circus bear on a tricycle. I went with the Rox Speed FX Pivoting Handlebar Risers with a 2″ rise. I got the 2″ version so I could get enough rise without straining the cables, and the pivoting lets me put the handlebars forward without having to roll the bars to an uncomfortable angle.
Hand Guards (Bark Busters): Since this is a motocross bike, it had no protection. And since I’m going to try to do technical stuff with this bike, I might as well spend $30 and save my fingers when I try to climb a tree. I went with Tusk aluminum handguards because I don’t trust plastic ones.
Sprockets: For the countershaft sprocket (front), I went with a 12-tooth Sunstar for $22, and the rear sprocket a JT Sprockets 53-tooth for $30. Now I know what you’re thinking, and yes, I am aware that that is an insane combination, but here’s why I did it.


I Need To Work With What I Have
The Honda CR250 is a two-stroke designed for motocross. I knew most of the power would be in the mid-to high-RPM range. By installing the 12t/53t sprocket setup, I was able to utilize the power in the mid-RPM range at slow speeds. Now, I have all the torque I can handle for tight woods riding without overheating the clutch.
This will let me cruise in second gear through tight wood trails without shifting. I’m ALWAYS in the power band. The CR250’s horsepower range is around 45hp. I’ll be able to pull the front wheel with a quick twist of the throttle, saving my clutch and adding to the fun. This kind of acceleration and torque makes hill climbs more fun, too.
With this setup, I won’t have a high top speed, but that’s fine with me, considering I rarely get to 4th gear anyway. Since the engine is always where it needs to be, it dramatically reduces stalling.
What’s Next for the Honda CR250 Conversion?
My initial investment of $175 proved that this bike is a good candidate for a complete trail bike conversion. All these parts needed to be installed even if the bike wouldn’t have made a good trail bike, so I went with inexpensive brands like Sunstar and Tusk instead of Renthal. It turns out the cheap stuff works just fine for fun, and now I’m curious how long they will last.
The next step is to fix the exhaust and suspension. There are so many options available at this point for a good exhaust pipe that I’m going to have to do some research to find what works. My main concern is how the new pipe will affect my current sprocket setup. I don’t want to spend more money than I have to.
The suspension rebuild will give me another opportunity. I’ll be able to install springs with the proper weight rate (I’m 340lb on a good day). Check back to see how this 1997 Honda CR 250 trail bike conversion is going!
If you have any questions or comments, please leave them in the comments or on our Facebook page!


